
Right or wrong?
More thoughts about why some projects are easier than others
Mar 31, 2026
A good half of what makes projects, weaving and otherwise, easy or difficult boils down to how easy or difficult it is to tell right from wrong. (The other half is the technical side of a project: how easy or difficult it is to execute what you know to be right. Taking an example from woodworking, once you’ve measured twice (at least), cutting exactly on the mark also takes some skill.)
When threading a loom, “right” is having each warp end threaded in a heddle on the right shaft in the right order. The weaver has to get the information (which thread on which shaft, i.e, the threading draft) and execute it (actually pass the thread in the eye of a heddle on the correct shaft).
The threading draft is often represented on a diagram, with or without numbers for the shafts, and with or without vertical lines to separate the ends. The diagram resembles the organisation of heddles occupied by the threads on the shafts, a bit like a map.

For people who prefer lists of instructions to diagrams or maps, the above diagrams can be read as “1,2,3,4,1,2,3,4,1,2,3,4…”. (If numbers are intimidating, a friend of mine pointed out that shafts can also be given names instead of numbers, such as Annette for the first shaft, Josephine for the second, Norma for the third and Eleanor for the fourth. The above threading becomes “Annette, Josephine, Norma, Eleanor, Annette, Josephine, Norma, Eleanor, Annette, Josephine, Norma, Eleanor…”. It’s longer to write but represents the same threading.)
In any case, the threading can also be summarized as repeats of (1,2,3,4) (or of (Annette, Josephine, Norma, Eleanor)), also known as straight draw (here, on 4 shafts).
When I thread such a draft, I set out the first 4 ends, slide out one heddle on each shaft, and thread the first end on the first shaft, etc. There is a modest control system that checks that I haven’t skipped a heddle (I would have an extra end) or dropped an end (I would have an extra heddle). Before moving to the next repeat, it is easy to check that the repeat is correctly threaded by lifting the group of threads to see if they give the right shape.
Threading a straight draw draft is usually straightforward, even with more shafts. The repeat is obvious and its shape is always the same.
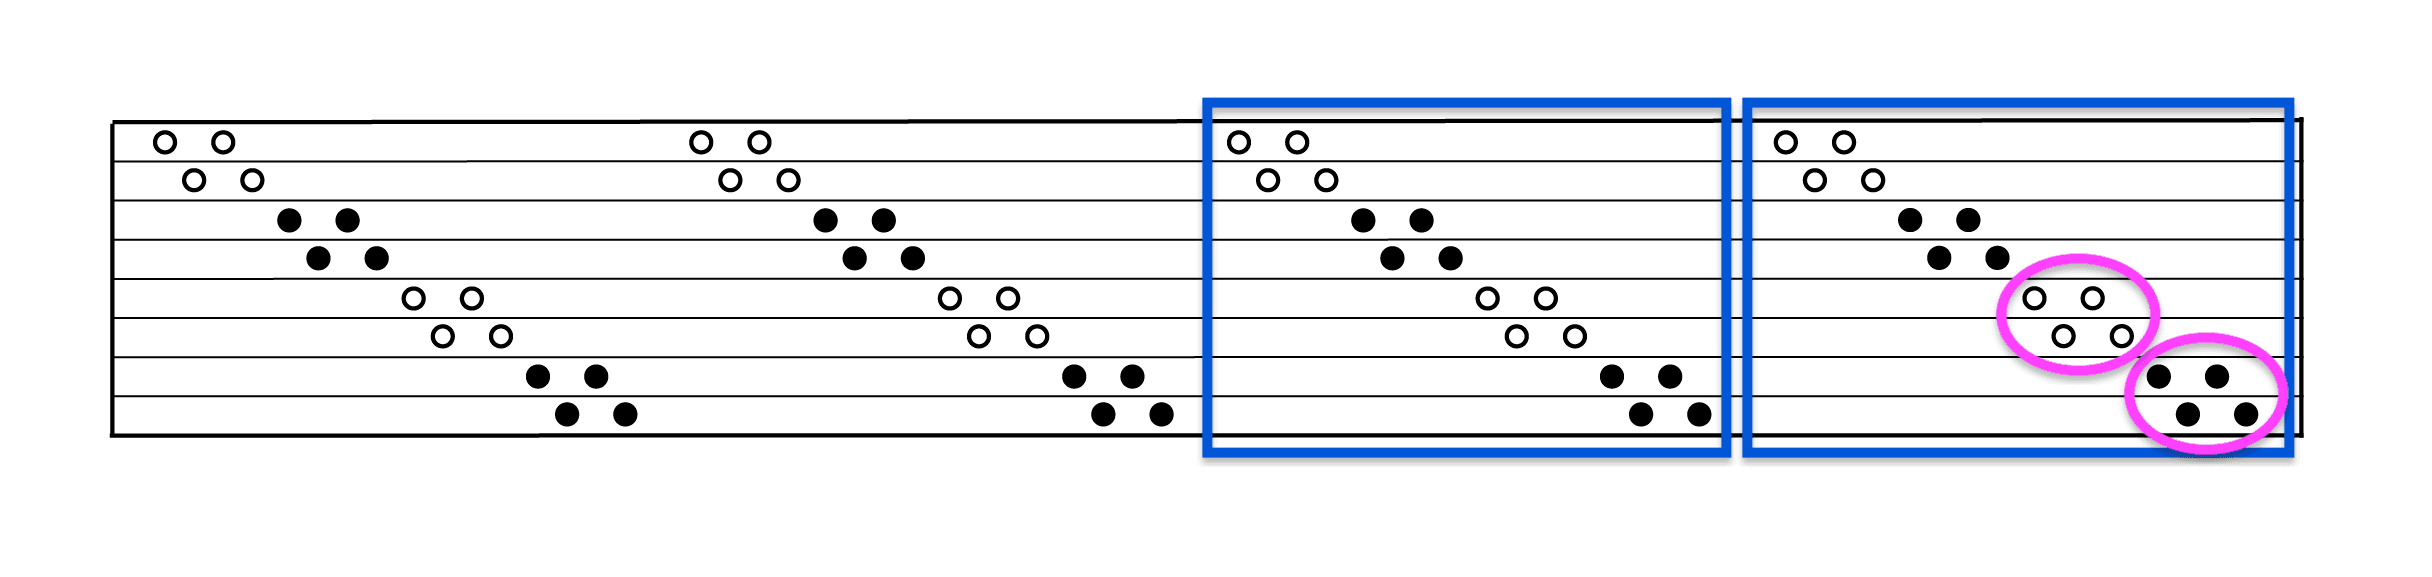
Here is another straightforward threading. It is an example of deflected double weave on 8 shafts. (More precisely, it can be used to weave deflected double weave with the appropriate tie-up and treadling.) It reads “1,2,1,2 in Black; 3,4,3,4 in White; 5,6,5,6 in Black… etc”. It can be summarized as
groups of 4 threads,
alternating between two colors,
each group threaded on two consecutive shafts (1,2 or 5,6 for black threads; 3,4 or 7,8 for white threads)
how the groups are organized is read on the draft; here, a straight draw.
To thread such a warp accurately, I set out the first group of 4 black threads and slide out two heddles on Shaft 1 and two heddles on Shaft 2. Then I thread the first thread on the first heddle on Shaft 1, the next on the first heddle on Shaft 2, etc. Same procedure with the next group of 4 white threads, sliding out two heddles on Shafts 3 and 4, etc. The classic mistake for such threadings is to move up only one shaft, e.g., to thread on Shafts 2 and 3 instead of Shafts 3 and 4 after threading on Shafts 1 and 2.
This threading has two levels of repeats: the 4 thread groups (pink ovals), and the groups of groups (blue rectangles). It can be easy to get lost in the threads. When reaching the end of a blue rectangle repeat, it is a good idea to step back and check that groups of black and white threads alternate regularly, and that they are threaded on the correct shafts.
These two examples of easy threadings share a couple of features: they are made of simple elements (straight draw for the first example; groups of 4 black or white threads threaded on two consecutive shafts, and these groups are organized in a straight draw for the deflected double weave threading).
Put another way, both these threadings are chunkable and legible. In our weekly conversations, Lisa and I realized how important chunkability and legibility are to understand why a project is easy or difficult.
Legibility has to do with understanding what is going on, and with being able to see it happen at the loom. With experience, weavers get better at tackling less legible projects, the same way that a young reader moves on to harder reading materials. It happens to me when weaving a new structure: by the end of the warp, I can spot treadling mistakes that did not register at the beginning of the warp.
Chunkability has to do with recognizing the building blocks of a weaving project. Figuring out the chunks is one way to add legibility in a project, a bit like placing the bar lines at the right places makes a piece of music more understandable. Chunking is especially useful for threading. There is not necessarily a single or best way to slice up a threading draft into chunks; there is only a useful one, and that may depend on the weaver. That is, the goal of chunking is to help make threading manageable and accurate. For example, to thread the deflected double weave draft above, one could focus first on the big chunk (blue rectangle) and slide out 2 heddles on all 8 shafts. That would make it impossible to thread end groups on the wrong shafts without noticing the mistake.
What works at what stage of the process can also change. Lisa says, “I knot my warp in 1” bouts after beaming, but often the 1” bouts don’t correspond to my chosen chunks and I have to force myself to let go of the inch as the chunk unit.”
Let’s look at a threading that I think of as “difficult” (possibly the hardest threading I’ve put on my loom so far). It is based on a star twill I found in Twill Thrills (p. 55) that I modified a bit to fit my requirements. The cloth is shown on the banner picture, and the beginning of the threading is shown below.
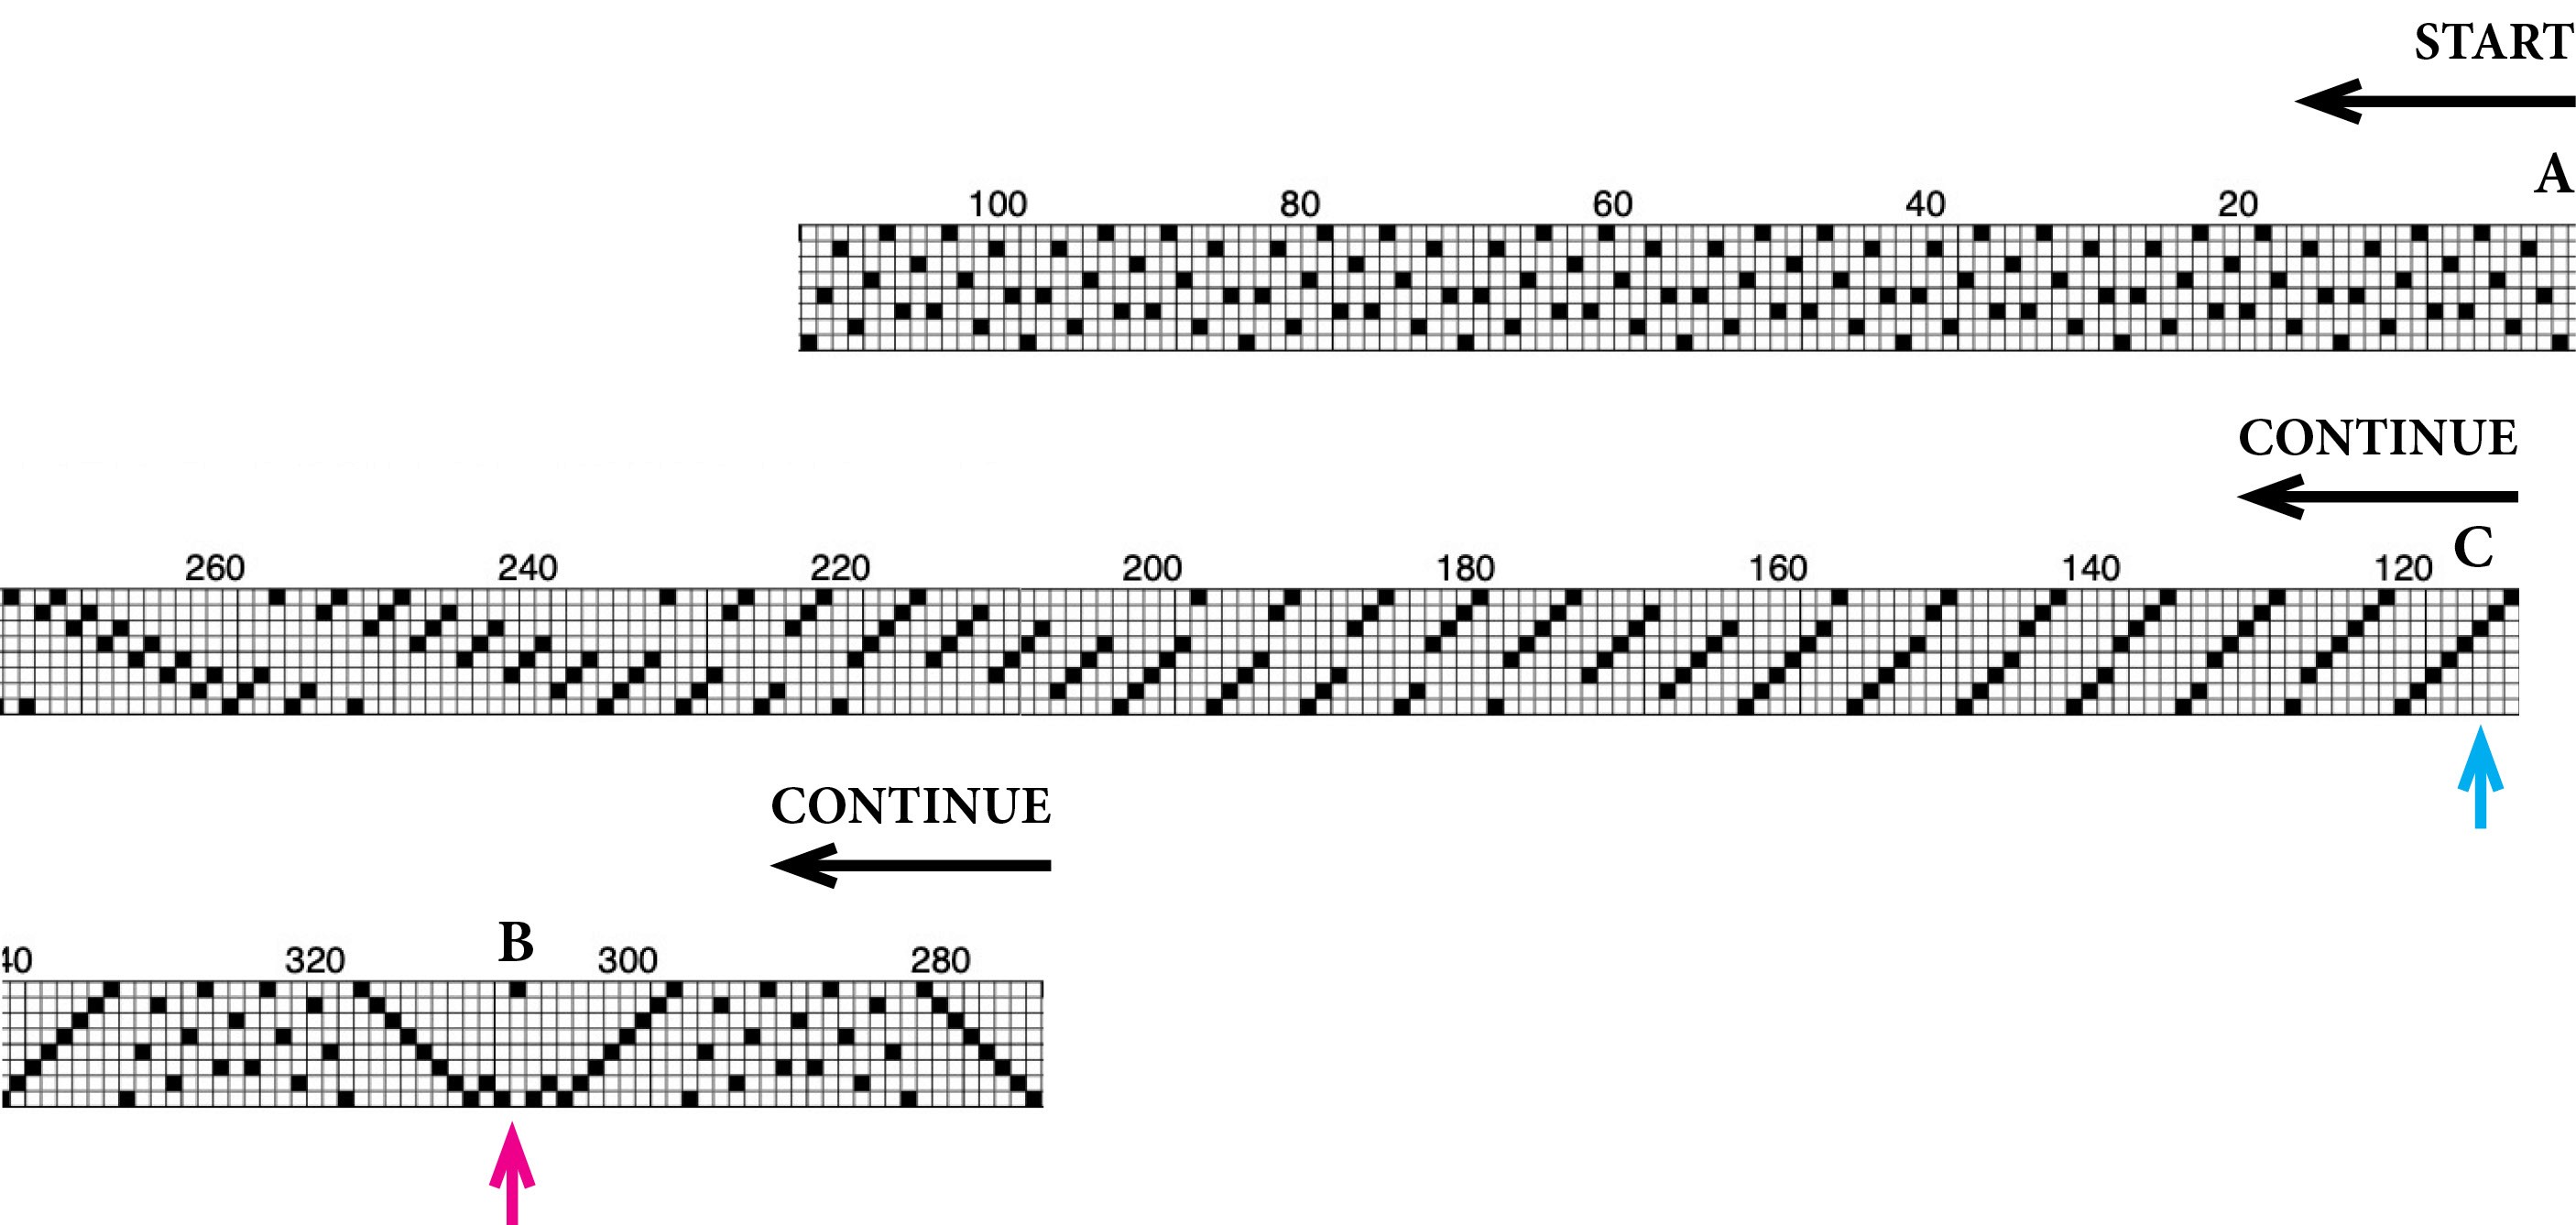
Here is about a quarter of the threading of the star twill. The pink arrow (at B) indicates the middle of one star, and the blue arrow (at C) indicates the middle of the threading. The full threading can be read as follows: thread A to B, then B to C, then C to B, then B to A, for a total of 998 ends.
I find such a threading difficult because I can’t figure out what’s going on at first glance and threading mistakes will be hard to spot (quite illegible), and the repeats are far from obvious (not readily chunkable). To thread it accurately, I had to find the useful chunks for each part of the draft, and find ways to be able to see what is correct from what is a mistake.
I had to give threading this warp my undivided attention (not even background music), but the key to success was analyzing the draft to make it as legible as I could. So if you fall in love with a project that’s a little daunting, consider trying to understand how it is put together, and figuring out how to slice it into manageable chunks.
Good luck!
In case you are curious, here are the details of how I divided and conquered the star twill draft.
The threading is clearly made of different segments. It starts with a blur of threads (the first line of the diagram above), then some advancing twill (the second line), then the center part of the star. These are three chunks, but they are too big to help me thread the warp. A finer analysis is needed.
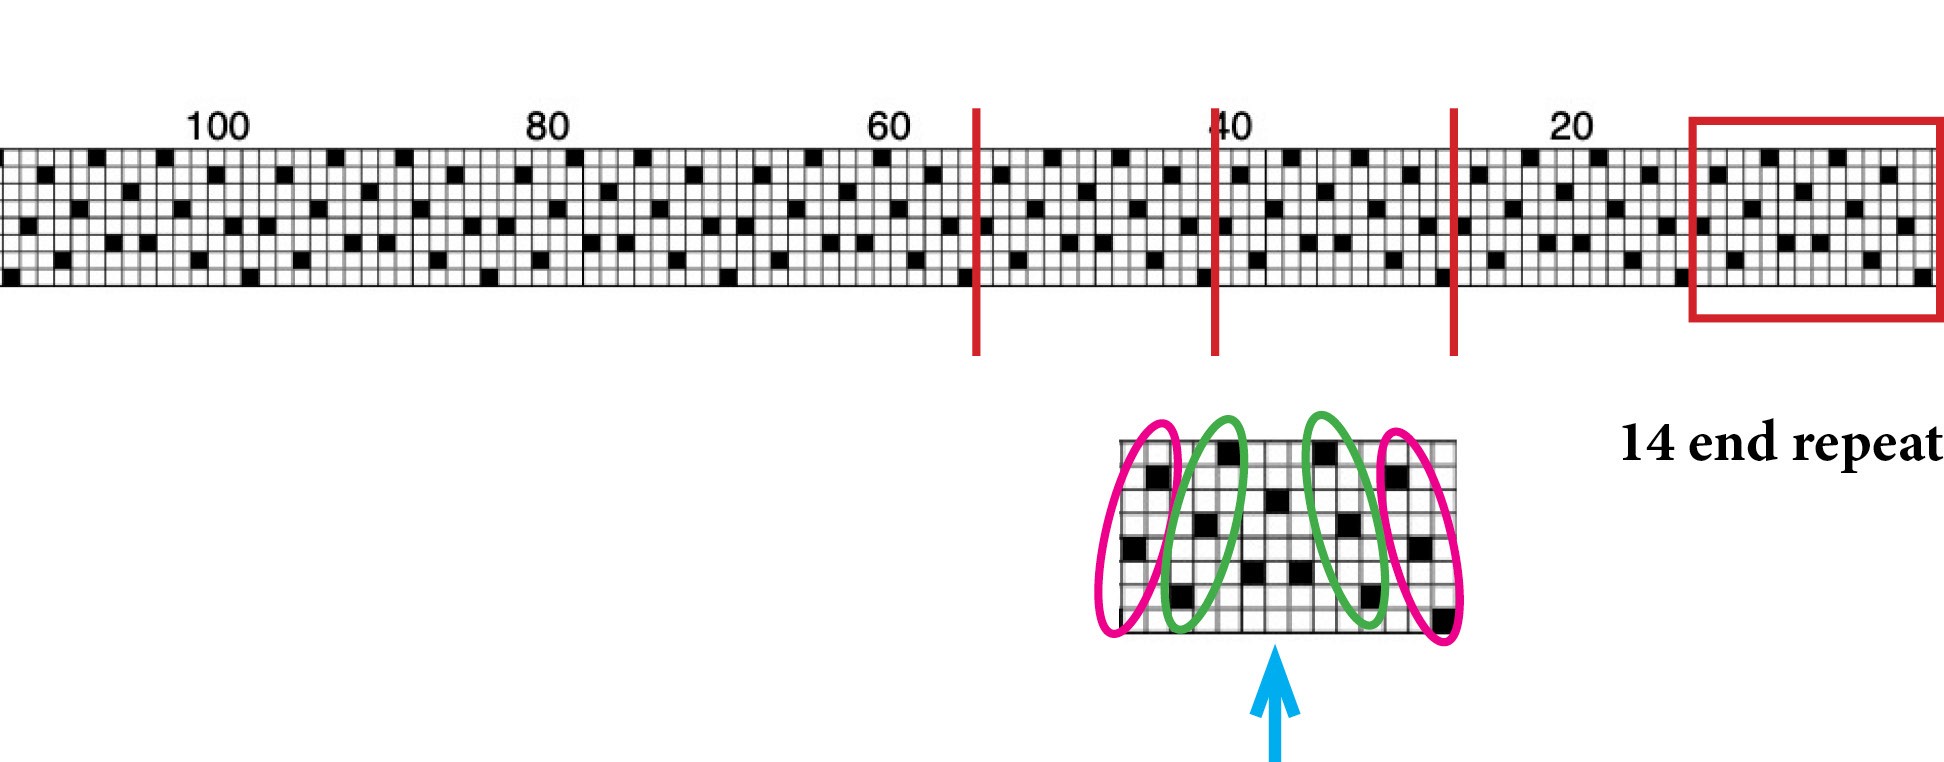
Looking more closely at the first segment, preferably on a piece of paper with a pencil, one can see a 14-end repeat. The first 8 ends are threaded on every third shaft, starting on the first shaft: 1, 4 (=1+3), 7 (=4+3), 2 (=7+3 - 8), 5 (=2+3), 8 (=5+3), 3 (=8+3 - 8), 6 (=3+3). These 8 ends occupy one heddle on each of the 8 shafts. The following 6 ends are using the same shafts in reverse order (that is, the repeat is symmetrical with respect to the 8th thread (blue arrow)).
I now know how it works, but I’m not sure it’ll help as I don’t naturally count in 3. I would thread each repeat in this segment in two parts. I would separate the first 8 threads and slip out one heddle on each shaft, then separate further the heddles on shafts 1, 4 and 7 and thread them, then separate further the heddles on shafts 2, 5 and 8 and thread them, then thread the remaining heddles. Before moving on, I’d check that each thread is where it’s supposed to be. Then I would separate the next 6 threads, slip out 1 heddle each in shafts (not 1 because it will be with the next repeat), 2, 3, 4, 5, (not 6 because it is the last thread on the first half), 7 and 8, thread the first thread on Shaft 3, separate further heddles on 8, 5, and 2 and thread them, then thread the remaining heddles. I’d check my work before moving to the next repeat.
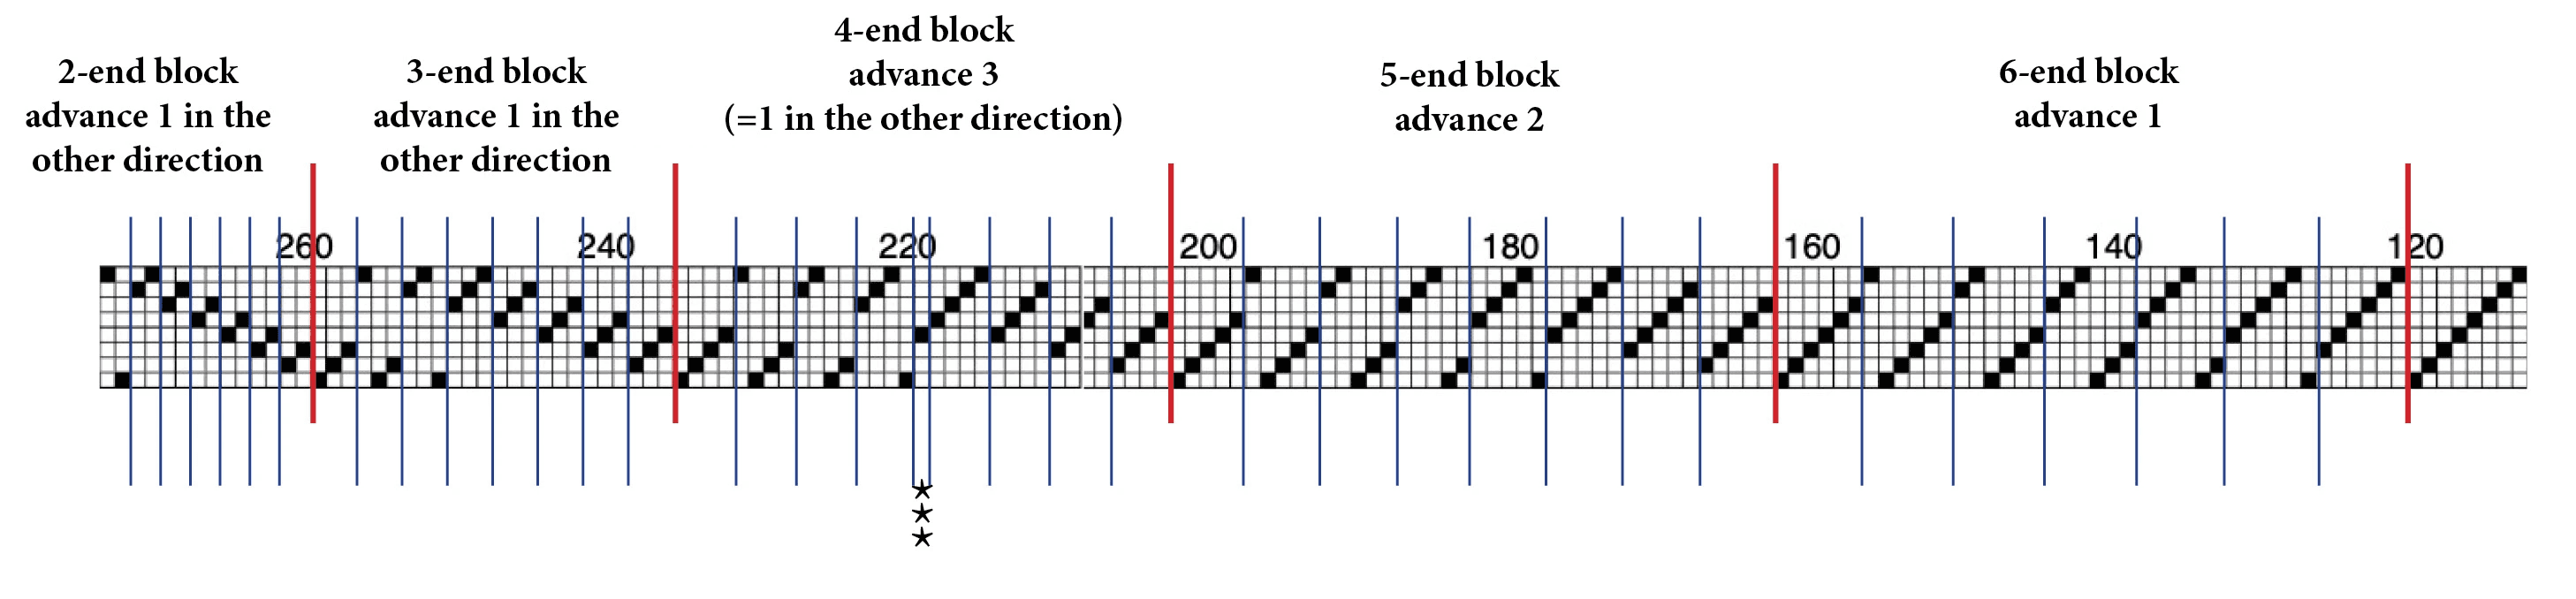
The advancing twill segment. It starts with one full straight draw—easy peasy—, then moves to a 6-end block advancing twill, then to a 5-end advancing twill, all the way to a 2-end advancing twill. The thin lines show the repeats within each advancing twill. The three stars in the middle of the 4-end advancing twill indicate an extra end between two repeats.
What I called the “advancing twill segment” is actually made up of multiple advancing twills. (For more about advancing twills, check out the advancing twills chapter in general, and the introduction by Ingrid Boesel in particular (pp. 38–41), in Twill Thrills.) The goal here is not to come up with a complete theory of these advancing twills, but to chop them in pieces that will make the threading easier to comprehend (more legible), and thus easier to thread without mistake. I first chopped this part of the draft in a different way, and it helped only a little. Once I realized that these were a bunch of advancing twills of decreasing block size (from 6-end to 2-end blocks), threading became easier.
The key is to remember that shaft numbers circle back. For example, looking at the beginning of the 6-end advancing twill, the first repeat is 8,7,6,5,4,3. Adding 1 to each shaft for the next repeat gives 9,8,7,6,5,4, but Shaft 9 is actually Shaft 1, so the second repeat is 1,8,7,6,5,4.
I leave it to the reader to figure out how to slice up the last bit of the threading.
Véronique
Banner picture: Star twill scarf
Comments


